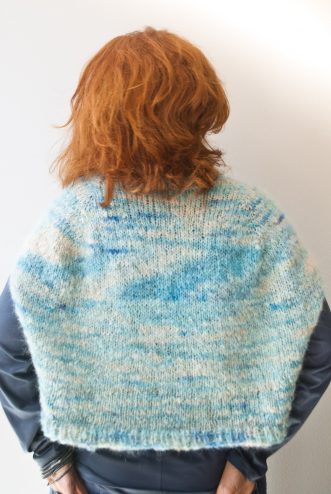
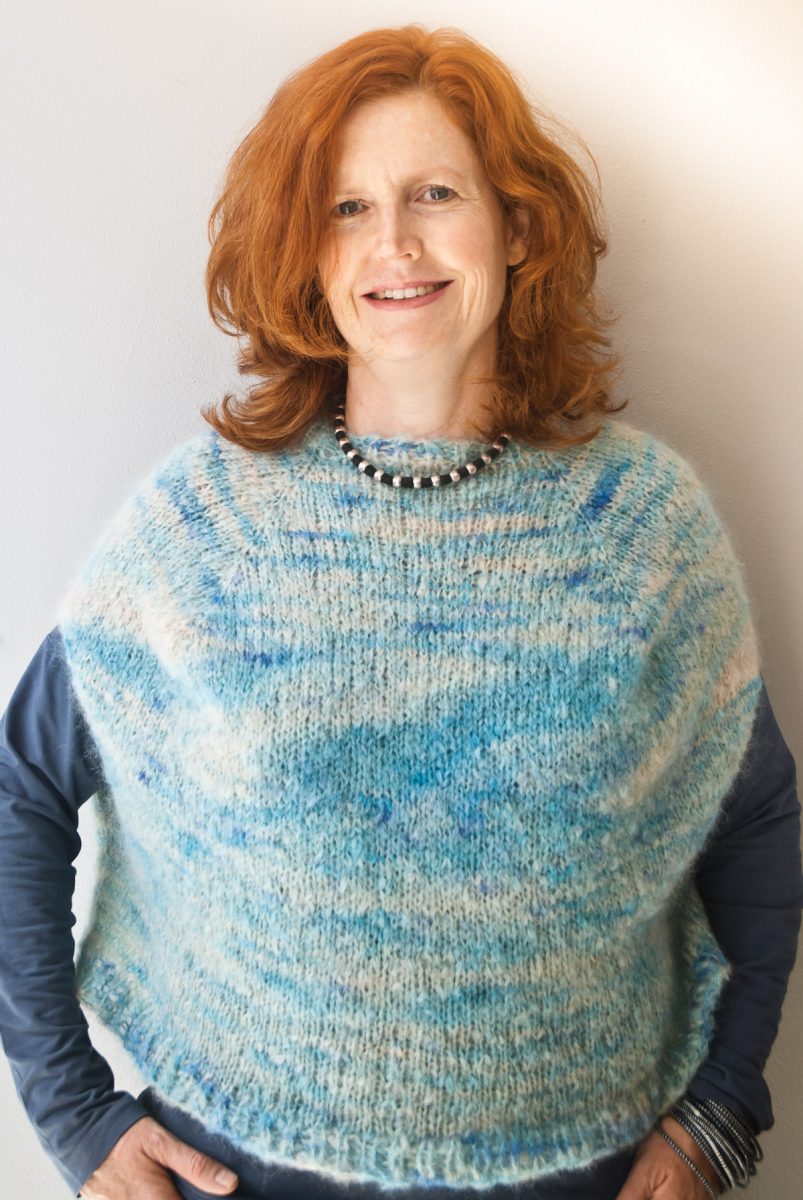
Astrid, a top down sleeveless poncho
Astrid is a top down sleeveless poncho “thingy” that I created using our new Fluffy Mohair yarn. The yarn is a luxurious blend of kid mohair and wool which is light, airy and incredibly soft. And I love how it knits up especially for this kind of slouchy, relaxed fit top. This is a great pattern to try if you’re new to top-down knitting because it isn’t terribly complicated. One reason for this is that there are no sleeves. Another is that it doesn’t have any body shaping to worry about. As a result you can focus on the knitting, especially if you’re new to mohair. The armholes are created by knitting the front and back separately then joining them together for the waist. And you can experience the beauty of top down knitting which is that you can try the piece on as you go and make sure you like the fit. I hope you’ll enjoy it.
MATERIALS
2 x Cowgirlblues Fluffy Mohair, I used Shorebreak
5.5mm 100cm circular needle
4 x stitch markers and one more in a different colour or style
[If you’re not keen on variegated yarns then you can use two of the same or different solids. It will work well as a colour block, and it also looks good if you create stripes of two alternating colours and make the stripes different widths, or the same, depending on your preference.]
SIZE
This is a loose fit top that I’ve only created in one size but it’s quite easy to make it bigger or smaller. The bust fit is a 36-38inch with ~20 cm positive ease. The actual width at the top of the armhole is ~65 cm. And the finished length is 60cm.
You’ll need extra yarn if you’re going to knit it bigger than the pattern as I used the full two skeins in my sample ie ~400m.
It’s a very simple style, with limited shaping. As a result it creates a lovely slouchy and warm sleeveless piece that is comfortable and easy to wear and a practical wardrobe staple.
[When I started experimenting with the pattern idea I didn’t get the increase placement shaping right, but I still get compliments every time I wear it. And when I wore my second sample a friend bought it off my back, then asked me to knit up two small ones for her grand daughters. With that encouraging feedback I’m sure you’ll love it!]
MEASUREMENTS
Neck opening: ~20cm across
Neck edge to armhole opening: ~32cm
Armhole opening: ~20cm
Armhole to hem: ~14cm
Width at top of armhole: ~80cm
Width at hem: ~70cm
GAUGE
~11st and ~17 rows to 10x10cm in stocking stitch
STITCH GLOSSARY
K: knit P: purl
PM: place marker SM: slip marker
EOR: End of round BTM: before the marker
KRPR: Knit 1, Return this stitch to the main needle, Pass the second stitch on the main needle over the one you have just slipped and passed, Return the stitch to the working needle
SKP: Slip 1 as if to knit, K1, pass the slipped stitch over
M1bl: Make one backwards loop (See the video tutorial)
Join: To join in the round I use the “crossed stitch” method (See the video tutorial)
KNITTING INSTRUCTIONS
Cast on 48 stitches taking care not to pull them too tight or it won’t fit over your head
Ensure the stitches are straight on your needles then join them using the “crossed stitch” method. Use the “magic loop” until you have enough stitches to stretch all the way around your cable.
Work 4 rounds in K1P1 rib
R5: This is the setup round. Knit all stitches and place markers as follows: K4, pm, K16, PM, K8, PM, K16, PM, K4, place EOR (this is situated at the side edge of the garment)
R6: work the first increase round as follows (K to one stitch before marker, M1bl, K1, Slip marker, K1, M1bl), repeat to the end of round marker
R7: Knit
Repeat rounds 6 and 7 until you have 184 stitches or until your desired fit.
[The nice thing about knitting top down is you can try it on for size. However if your cable isn’t long enough for fitting comfortably don’t worry. Just use some waste yarn to take the stitches off the needles so you can try it on. And put them back on your needle when you’re ready to keep knitting]
Change to knit rounds only and work another 14 rounds (~32cm from neck edge)
The armholes are created by working the front and back separately as follows:
Front:
Leave the back stitches on your needle or put them on a holding cable and work the front 92 stitches, starting on the wrong side
R1: Sl1, K1, purl to last 2 stitches, K1, K1tbl
R2: Sl1, K1, SKP, knit to last 4 stitches, KRPR, K1, K1tbl
R3-12: Repeat Rows 1 and 2
Work in stocking stitch for another 18 rows but continue to Sl1, K1 at the start of every row, and K1, K1tbl at the end of every row (30 rows or 20cm in total)
Back
Repeat the front on the stitches you held for the back.
Joining up again
Knit 1 round to join back and front together, simply continue working from the back onto the stitches for the front, making sure to pull the yarn tightly as you join the stitches together.
Continue knitting in the round until you’re happy with the length.
Finish by working 4 rounds in K1P1 rib as you did at the neck then cast off.
FINISH
Weave in all your ends, handwash gently and dry flat.
Happy knitting!
-

- Astrid